Build Your Own Smokehouse
Cameron Faustman, Department of Animal Science, University of Connecticut
animalscience@uconn.edu
Reviewers: Ben Alderton and Rich Mancini
Publication EXT195 | April 2026 (originally published 2006)
Introduction
For many years, building a backyard smokehouse was primarily for smoking fish, but also for smoke-cooking pork and turkey, and making jerky and sausage. The goal was to construct a house with more capacity than is typically provided by smoker units sold in outdoor sports catalogs.
An article published in Fish Alaska magazine provided the general blueprint for many of the construction ideas outlined here (see “Smokehouse 101” by A.E. Poynor, Fish Alaska, July 2004, vol. 5, issue 5, pp 30-35). The actual smokehouse cost approximately $170 to build (including the propane burner used for heat and smoke generation).
Step-by-Step
Below are the general steps used to build the unit; individuals with carpentry experience could improve considerably on the design. As suggested by Poynor, 1” x 6” tongue-and-groove pine (21 - 1”x 6” x 8’ boards) was used, as this was the most economical option. Where necessary, the tongue located on the board at the outside edge of walls was removed using a utility knife.
Pressure-treated lumber should not be used since heat and smoke that comes in contact with the wood will contact food. Galvanized deck screws (1 5/8”) were used to fasten the boards to the framing pieces.
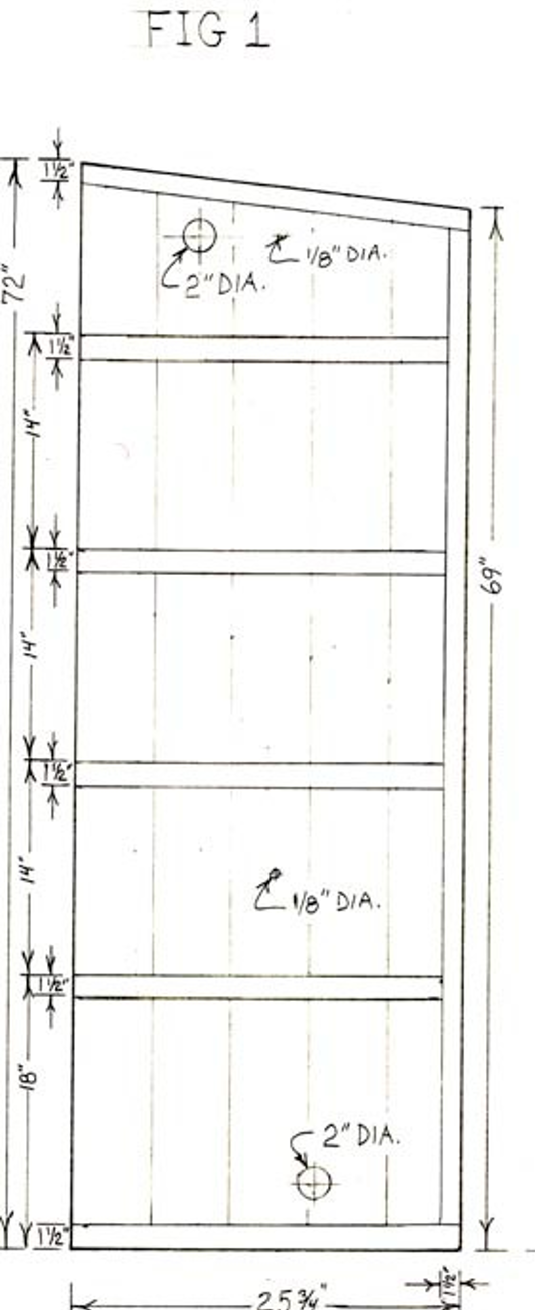
Sides for the smokehouse were constructed by fitting and clamping together five boards, with the edge groove facing the front and the tongue (removed) facing the back. The front height was measured to be six feet tall. The back was marked at 5’9”, a chalk line snapped, and the slope cut with a circular saw. We used 2”x 8” x
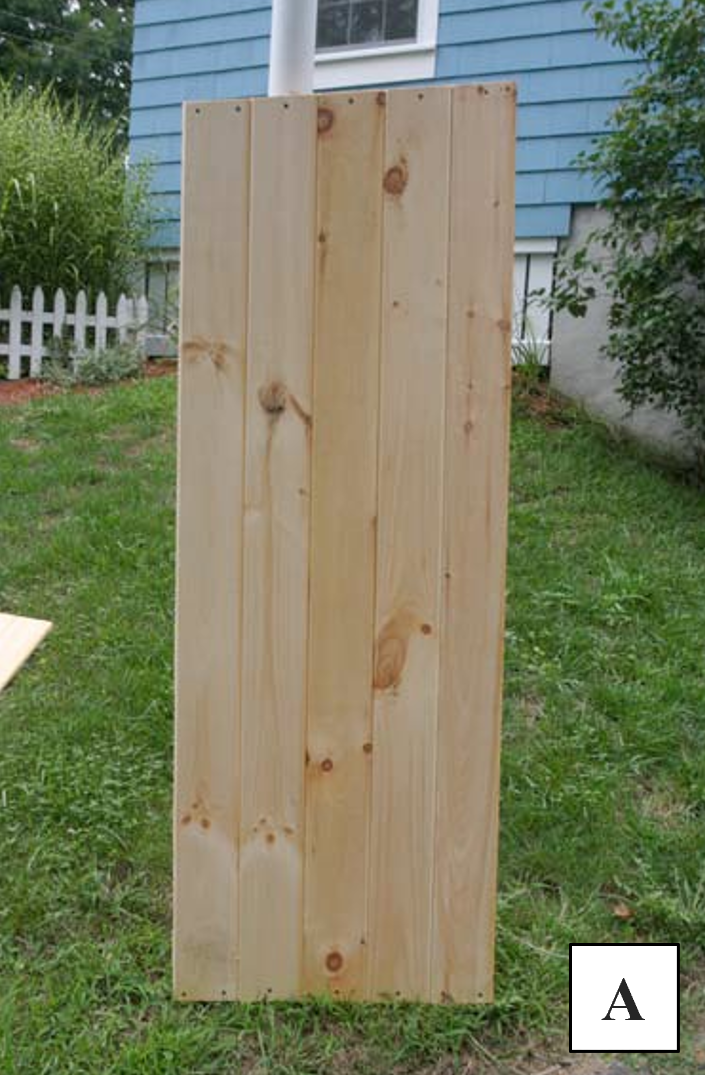
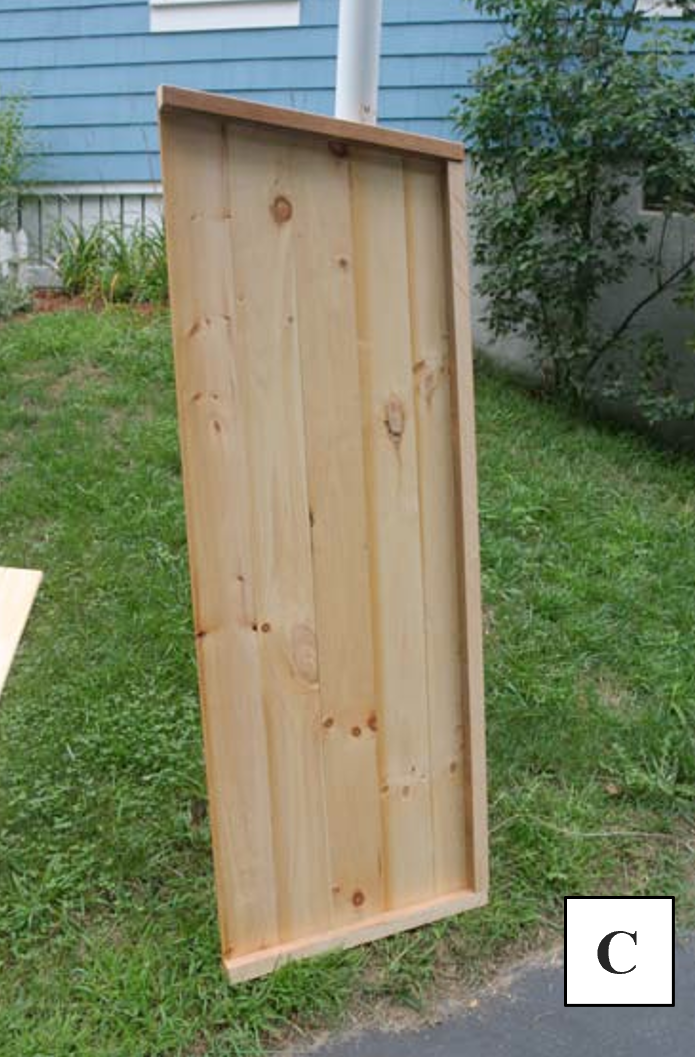
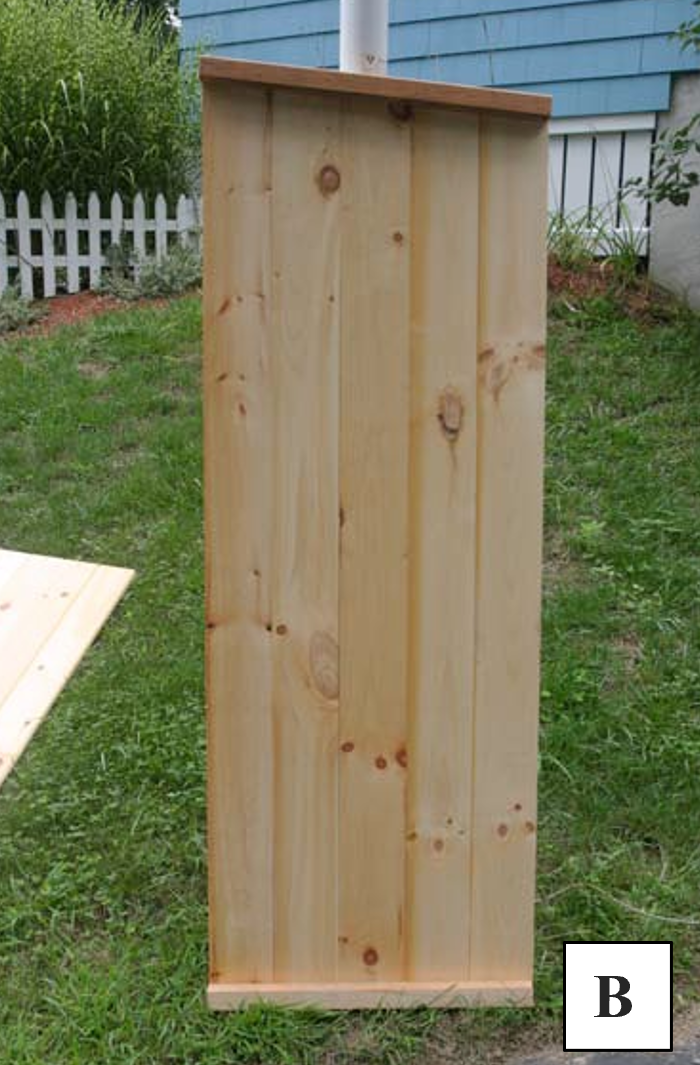
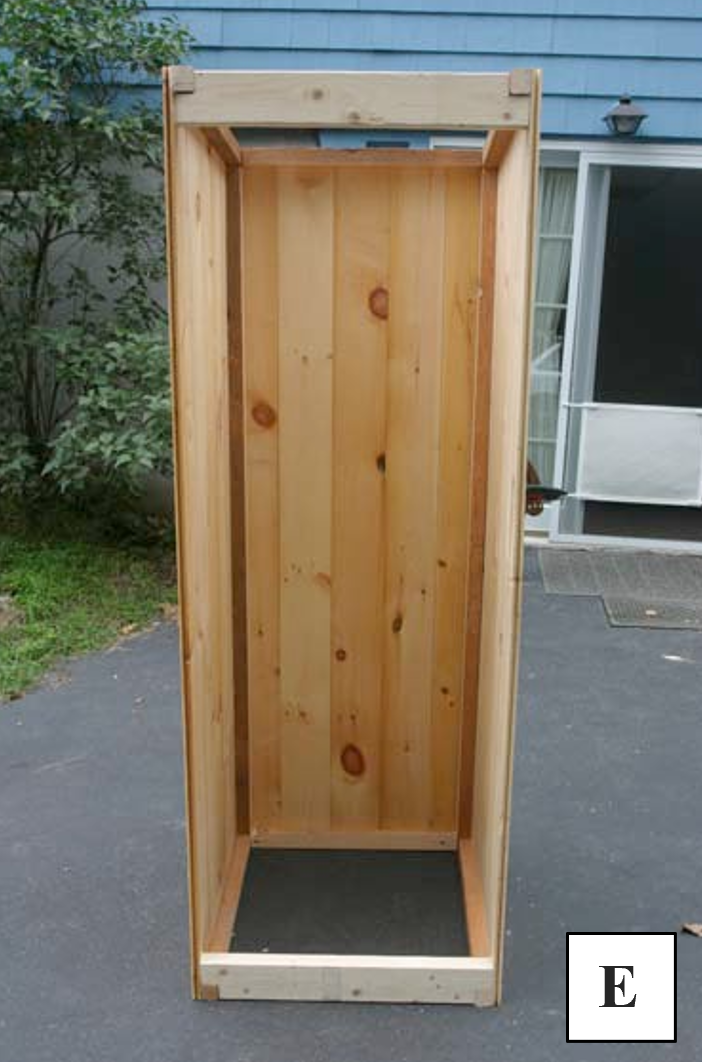
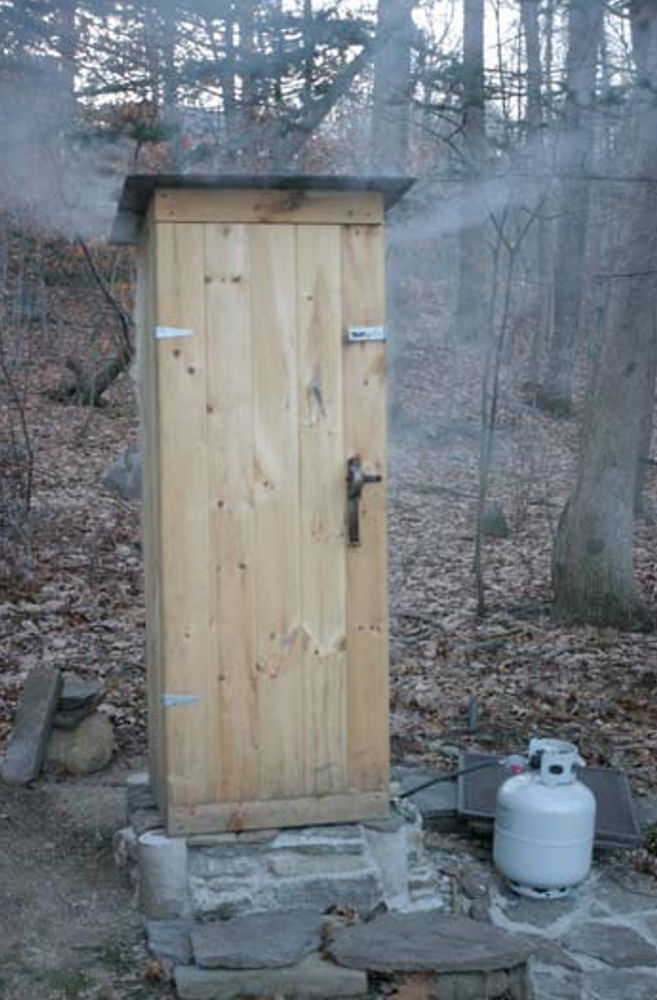
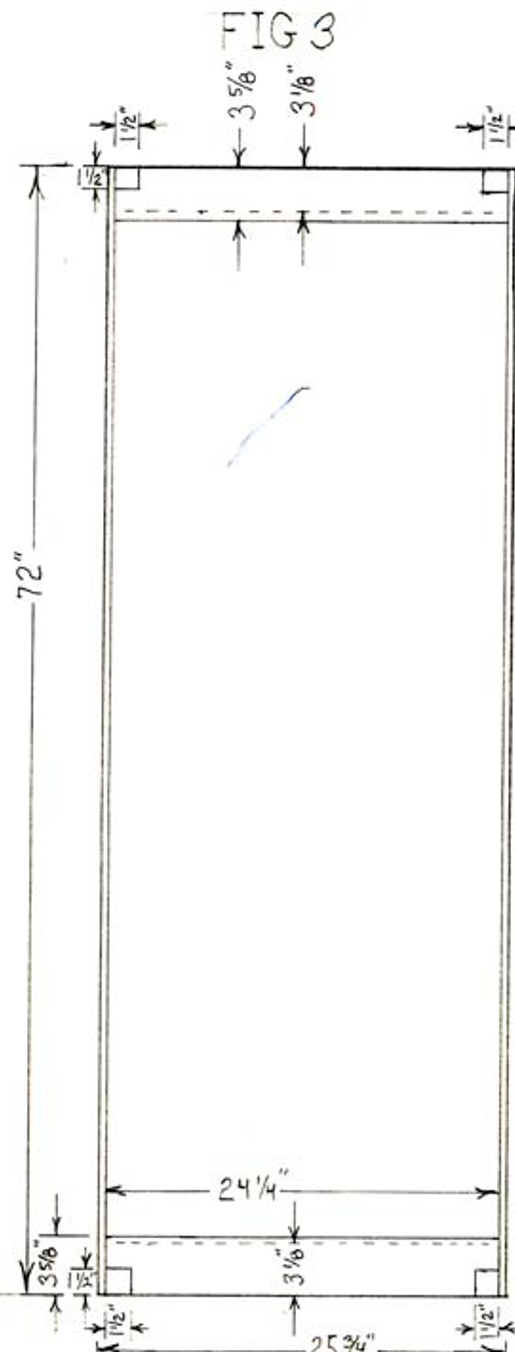
previous project and ripped them on a table saw to obtain 1½” x 1½” (actual dimensions) framing pieces. One of these was cut to 25 ¾” and fastened along the inside bottom edge, and one was cut to fit the sloping top with angles cut to make the front and back facing piece flush [Photos A, outside view; B, inside view & Appendix-Figure 1]. This was repeated (in mirror image) for the second side panel. Additional 1 ½” x 1 ½” (actual dimensions) framing pieces were fastened along the back edge of each side panel for future attachment of the back wall [Photo C and Appendix-Fig 1].
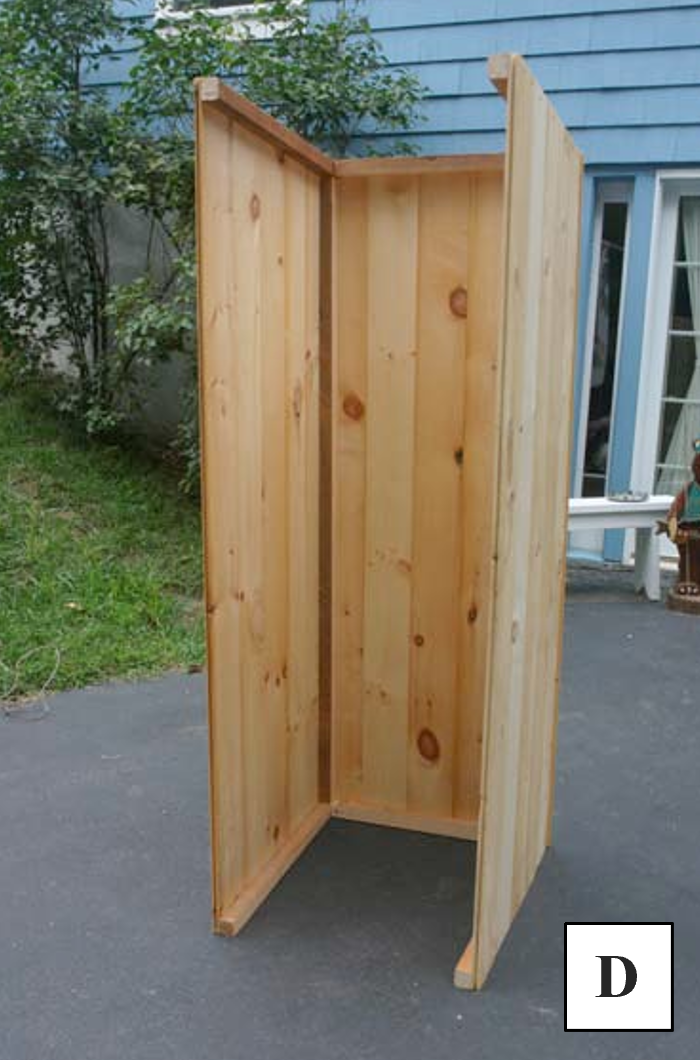
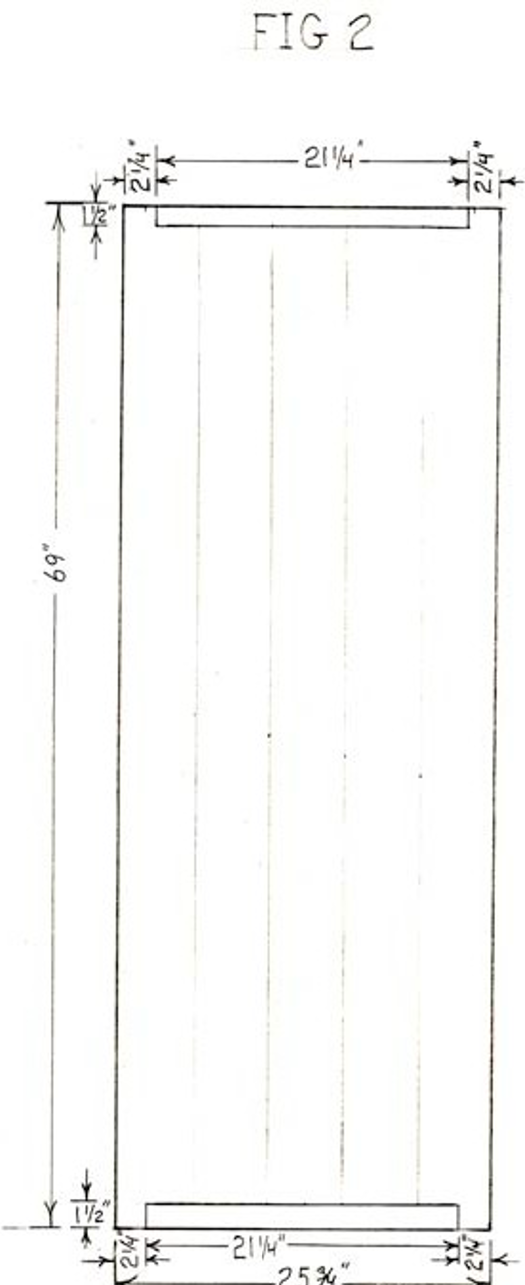
The back wall panel was constructed similar to the sides, with five boards cut to 5’9” in length. Framing lumber (two pcs – 21¼”) was fastened on the inside back wall, top and bottom, so as to fit within the framing pieces of the side walls [Photo D & Appendix-Fig 2]. The front portion of the smokehouse and 2” x 4” cross braces were fastened to the front portions of the two side panels; brace ends were notched to accommodate the ends of the top and bottom framing pieces of the side panels [Photo E & Appendix-Fig 3].
Pieces of 1” x 6” pine boards were ripped to the appropriate width dressing the 2”x 4” cross braces on top and bottom. Position these pieces flush with top and bottom brace edges so as to leave approximately ½” of the top and bottom cross braces exposed to serve as a door stop [Photo F & Appendix-Fig 3].
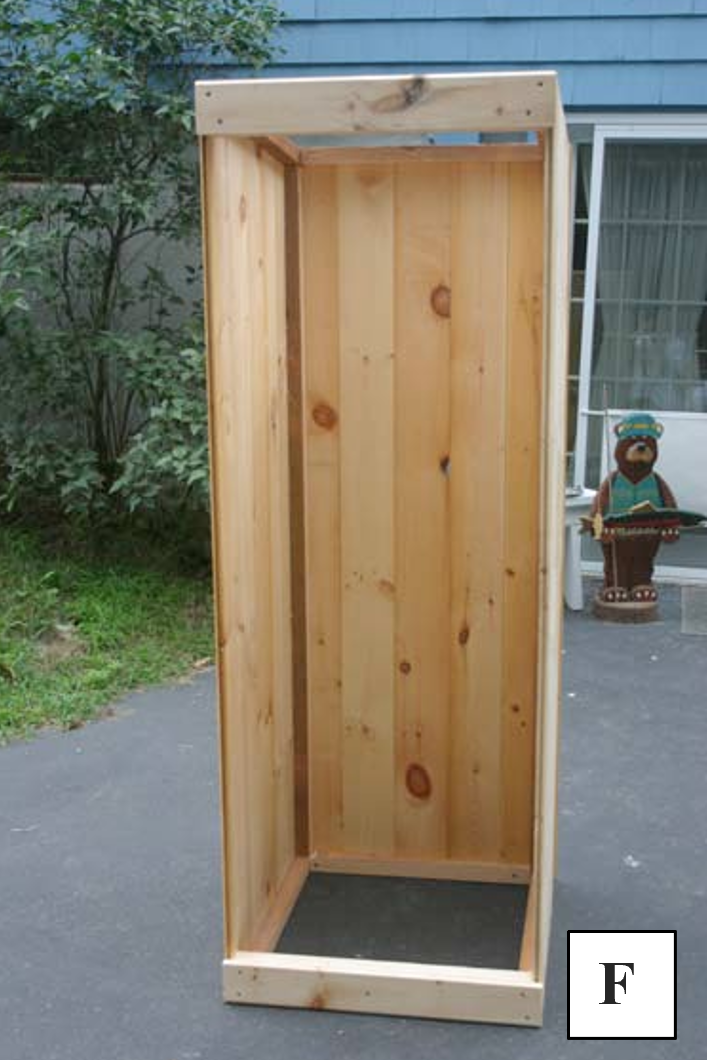
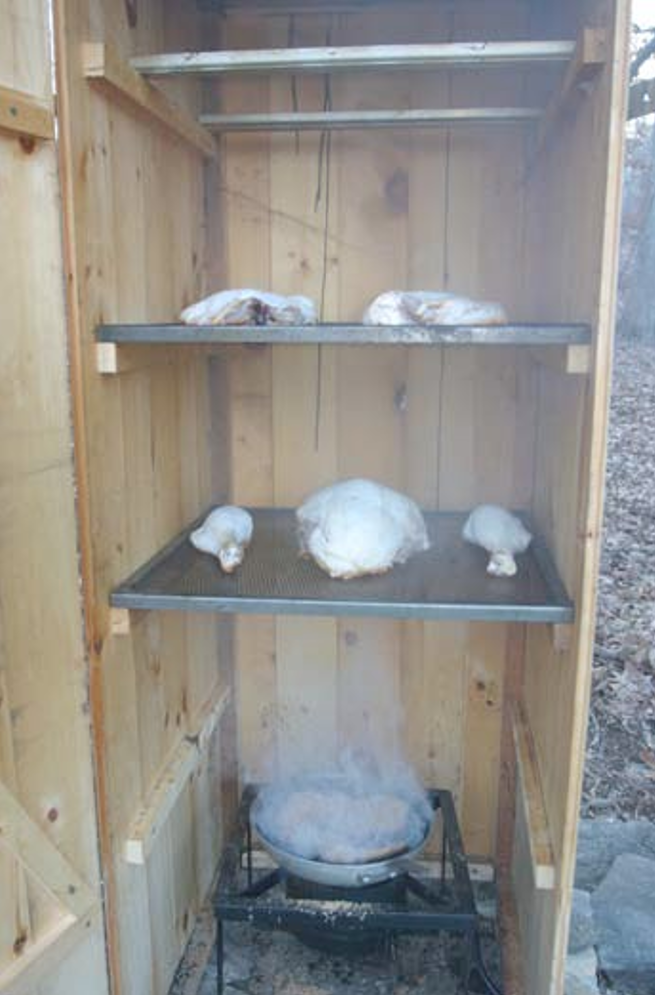
Eight shelf supports (1½” x 1½”) were cut to length and 4 supports fastened to the inside walls of each panel. The top of the first support was placed 18” above the floor, and each successive support was located with their top edges 14” above the support immediately below it (Photo G & Appendix-Fig 1).
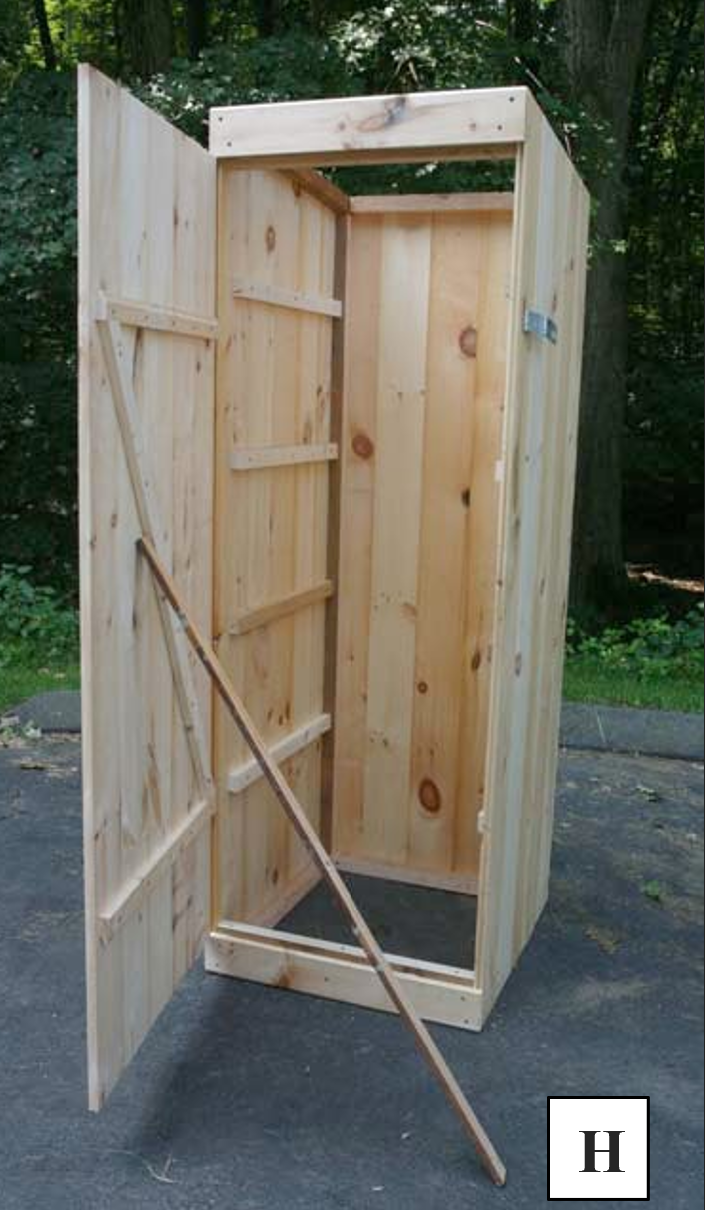
The door was constructed from the remaining five pieces of pine and cut to length, so as to fit snugly between the top and bottom pine pieces. The inside of the door was fastened together using one inch thick boards in a “Z” formation [Photo H]. The door was fastened to the smokehouse using two four inch strap hinges.

The roof can be constructed from a variety of materials. For this smokehouse, a piece of sheet steel was obtained locally and fastened to the top edges with screws leaving an “ice cream stick” thickness gap between the sides and roof.
It is recommended that galvanized metal be avoided.
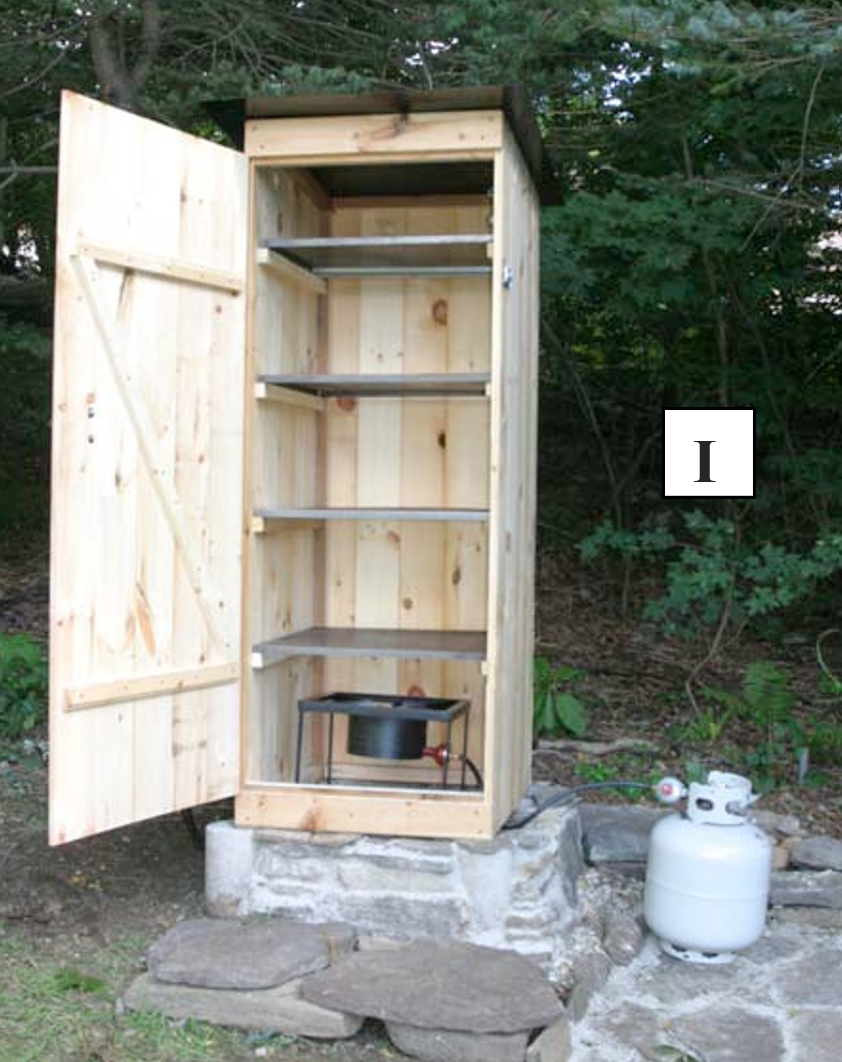
Shelves were made from expanded steel and reinforced with angle pieces around the perimeter. It is important to remove any oil from the steel pieces before placing any food on them.
For smoke generation, the approach of Poynor (2004) was adopted, and a single burner system fueled by liquid propane (Figure I) was purchased. Other smokehouse designs reviewed use an external stove-like system to generate smoke, which is then piped into the base of the smokehouse unit. The concern with this method is the potential difficulty in regulating the temperature sufficiently to avoid over-cooking and over-drying. An old cast-iron pan can be placed on the single propane burner and filled with hardwood (e.g. apple, hickory, alder) chips/sawdust to produce smoke.
In order for the unit to work properly, air must be able to draft in from below and exit out the top.
The degree to which this is controlled will determine the heat build-up and degree of smoke that exists within the house. We placed the smokehouse on a small stone foundation that provided plenty of space for air to draft in, and drilled a couple of 2” diameter holes near the top of each side and just under the roof [Appendix-Fig 1].
If the base of the smokehouse is tight to the foundation (or a gravel pad), two-2” diameter holes should be drilled near the base of each side [Appendix-Fig 1]. To further control draft, galvanized steel electric junction box covers could be fastened to cover the ventilation holes, and adjusted as needed, to act as dampers.
Ventilation holes can be screened on the inside to deter pests from entering the smokehouse. Small holes can be drilled into the sides of the smokehouse to accommodate stem thermometers if desired (diameter dependent upon stem thickness).
During a smoke-cooking cycle, we prefer to start at 120°F and then increase the temperature slowly over a period of several hours. If smoke-drying (e.g. jerky, salmon) is your goal, a slower gradual heating is better. A preference is for an internal temperature of the smokehouse not exceed 180°F. The door can be opened slightly, if needed, to control the temperature. Remember, the wood used to build this smokehouse will readily burn if ignited, and supervision throughout the process is important for safety reasons.
During a smoke-cooking cycle, the door of the house may warp outward a bit and will want to ‘burp’ open. This allows a considerable amount of heat and smoke to escape, which can be minimized by using a hasp to secure the door, approximately halfway down the door’s length.
Final Thoughts and a Recipe
In general, meats with a bit of fat on them tend to smoke-cook in a more controllable manner than lean cuts. If possible, it’s always desirable to inject meat cuts with dilute brine using a large needle; these are available from a variety of outdoors stores/catalogs. There is also a variety of flavorful marinades available in which to soak meat products before smoke-cooking. To facilitate cleaning of the expanded metal screens, treat the surfaces with a vegetable oil spray before placing the meat on them.
Our favorite product is smoked trout and salmon.There are many brine recipes available, but our favorite is as follows. For 12 lbs of fillets, prepare a brine that combines 1 liter of inexpensive vodka, 12 oz lemon juice, four lbs brown sugar, and five cups of salt.
This brine will be very viscous and should be spread over the flesh side of the fillets; if fillets are layered within the pan, placed them flesh sides together. Place the brined fillets in the refrigerator for one and half to two days.
Briefly wash the fillets in cold water to remove surface salt and sugar and smoke for five plus hours (depending on the desired level of smokiness) keeping the smokehouse temperature low (120°F) at the start and working it slowly up to 180°F to finish off the process.
Depending on the depth of the pan over the propane burner, sawdust will likely have to be replenished two or more times during the process.
Acknowledgement: Thanks are expressed to Ben Alderton and Rich Mancini for their critical review of this document.
The information in this document is for educational purposes only. The recommendations contained are based on the best available knowledge at the time of publication. Any reference to commercial products, trade or brand names is for information only, and no endorsement or approval is intended. UConn Extension does not guarantee or warrant the standard of any product referenced or imply approval of the product to the exclusion of others which also may be available. The University of Connecticut, UConn Extension, College of Agriculture, Health and Natural Resources is an equal opportunity program provider and employer.